Git & GitHub from Scratch: A Practical Guide to Version Control Mastery
In IT
industries, during the software build lifecycle or in any modern project, code
and configuration files are constantly modified. It is very important to track
what was updated, why it was updated, and who made the update. This helps in
troubleshooting issues, rolling back to a previous version, or releasing a
properly tested and stable version.
Instead of
copying files repeatedly and emailing them to the team to maintain records,
managing changes in a controlled and systematic way is called a Version Control
System.
Git is a
modern distributed Version Control System that tracks changes in code and
configuration files efficiently. It maintains a complete history of
modifications, allows safe rollbacks, and enables structured collaboration
across teams. In today’s software development and DevOps environments, Git is
not just a tool, but a foundational skill for managing change with confidence.
Before
directly exploring Git, let us first understand how files were versioned
manually. Earlier, developers used tools like diff to compare changes between
files and patch to apply those changes to another file. This method allowed
tracking differences and updating files without rewriting everything, but it
was manual, less structured, and difficult to manage at scale.
Diffing File:
In Linux, to
compare files efficiently and accurately, the diff command is used.
Examples:
cat b2b_v1.txt ;
cat b2b_v2.txt ;
diff b2b_v1.txt b2b_v2.txt
The output
highlights the differences between the two files.
Application Name: Byte2Build
Version: 1.0
Environment: Development
Debug Mode: Enabled
Database: MySQL
Maintainer: Byte2Build Team
Timeout: 30
Application Name: Byte2Build
Version: 2.0
Environment: Production
Debug Mode: Disabled
Database: PostgreSQL
Maintainer: Byte2Build Team
Timeout: 45
Logging: Enabled
2,5c2,5
< Version: 1.0
< Environment: Development
< Debug Mode: Enabled
< Database: MySQL
---
> Version: 2.0
> Environment: Production
> Debug Mode: Disabled
> Database: PostgreSQL
7c7,8
< Timeout: 30
---
> Timeout: 45
> Logging: Enabled
The above commands first display the contents of b2b_v1.txt and b2b_v2.txt, allowing us to review both versions manually.
The diff command then compares the files line by line and highlights the differences.
In the output, lines starting with < belong to the original file, and lines starting with > belong to the modified file. Indicators such as 2,5c2,5 and 7c7,8 show which line ranges were changed (c stands for changed).
The diff
command compares two files at a time. If multiple comparisons are required, it
must be executed separately for each pair of files.
For clearer
and more readable output, the unified diff format is commonly used:
diff -u b2b_v1.txt b2b_v2.txt
Output :
Byte2Build@localhost:/$ diff -u b2b_v1.txt b2b_v2.txt
--- b2b_v1.txt 2026-02-24 09:07:45.784000000 +0530
+++ b2b_v2.txt 2026-02-24 09:08:12.111000000 +0530
@@ -1,7 +1,8 @@
Application Name: Byte2Build
-Version: 1.0
-Environment: Development
-Debug Mode: Enabled
-Database: MySQL
+Version: 2.0
+Environment: Production
+Debug Mode: Disabled
+Database: PostgreSQL
Maintainer: Byte2Build Team
-Timeout: 30
+Timeout: 45
+Logging: Enabled
The -u
option stands for unified format. It displays differences between files along
with a few lines of surrounding context, making the output easier to read and
understand. This format is widely used in patches and version control
workflows.
Lines
starting with - were removed from the original file.(
--- represents the original file (b2b_v1.txt).)
Lines
starting with + were added in the modified file.(
+++ represents the modified file (b2b_v2.txt).)
Unmarked
lines represent unchanged content and provide context.(
@@ -1,7 +1,8 @@ indicates that the
old file had 7 lines and the new file has 8 lines in this section.
Patch File
When fixing
bugs or updating configurations, explaining changes manually can be unclear.
Instead, a diff file records the exact differences between two versions of a
file.
Using the
files created earlier, a patch file can be generated with:
diff -u b2b_v1.txt b2b_v2.txt > b2b_change.patch
cat b2b_change.patch
Byte2Build@localhost:/$ cat b2b_change.patch
---
b2b_v1.txt 2026-03-05 09:37:49.237000000
+0530
+++
b2b_v2.txt 2026-03-05 09:38:38.478000000
+0530
@@ -1,7 +1,8
@@
Application Name: Byte2Build
-Version:
1.0
-Environment:
Development
-Debug Mode:
Enabled
-Database:
MySQL
+Version:
2.0
+Environment:
Production
+Debug Mode:
Disabled
+Database:
PostgreSQL
Maintainer: Byte2Build Team
-Timeout: 30
+Timeout: 45
+Logging:
Enabled
The generated file b2b_change.patch contains all modifications between the two versions of the file.
These
changes can then be applied automatically using the patch command:
patch b2b_v1.txt < b2b_change.patch
cat b2b_v1.txt
Byte2Build@localhost:/$ patch b2b_v1.txt < b2b_change.patch
patching
file b2b_v1.txt
Byte2Build@localhost:/$ cat b2b_v1.txt
Application Name: Byte2Build
Version: 2.0
Environment: Production
Debug Mode: Disabled
Database: PostgreSQL
Maintainer: Byte2Build Team
Timeout: 45
Logging: Enabled
The patch
command reads the differences stored in the patch file and updates the original
file accordingly by matching the surrounding context.
Using diff
and patch is more efficient than sharing entire files because it shows only the
exact changes, preserves file structure, works across slightly different
versions, and scales well for collaborative development. This concept forms the
foundation of how modern version control systems manage and apply changes
between file versions.
1. GIT
GIT is a Version Control System (VCS) created in 2005 by Linus Torvalds, the developer of the Linux kerneL. It was designed to manage large and complex software projects where many developers work simultaneously from different locations.
Although the name Git does not
officially stand for anything, it is often informally expanded as Global
Information Tracker, referring to its ability to track changes in project files
over time.
Git follows a distributed
architecture, where every contributor has a complete copy of the repository
along with its full history on their local machine. This design makes Git fast,
reliable, and usable even when there is no network connection.
Git can operate in several ways:
- On a single computer, allowing
developers to work offline.
- As a server, hosting repositories
for team collaboration.
- As a client, accessing
repositories using protocols such as HTTP, SSH, or the Git protocol.
Because Git does not rely on a
single central server, it works well for both small personal projects and very
large projects with thousands of contributors.
Git is free and open source and
runs on major operating systems including Linux, Windows, and macOS. Today, Git
repositories are commonly hosted on platforms such as GitHub and GitLab.
Although Git is sometimes
referred to as SCM (Source Control Management), it is more accurately described
as a Version Control System because it can track changes not only in source
code but also in configuration files, documentation, and other project assets.
1.1 GIT Installation
Before
using Git, it must be installed on the system. Git is available for all major
operating systems including Linux, Windows, and macOS.
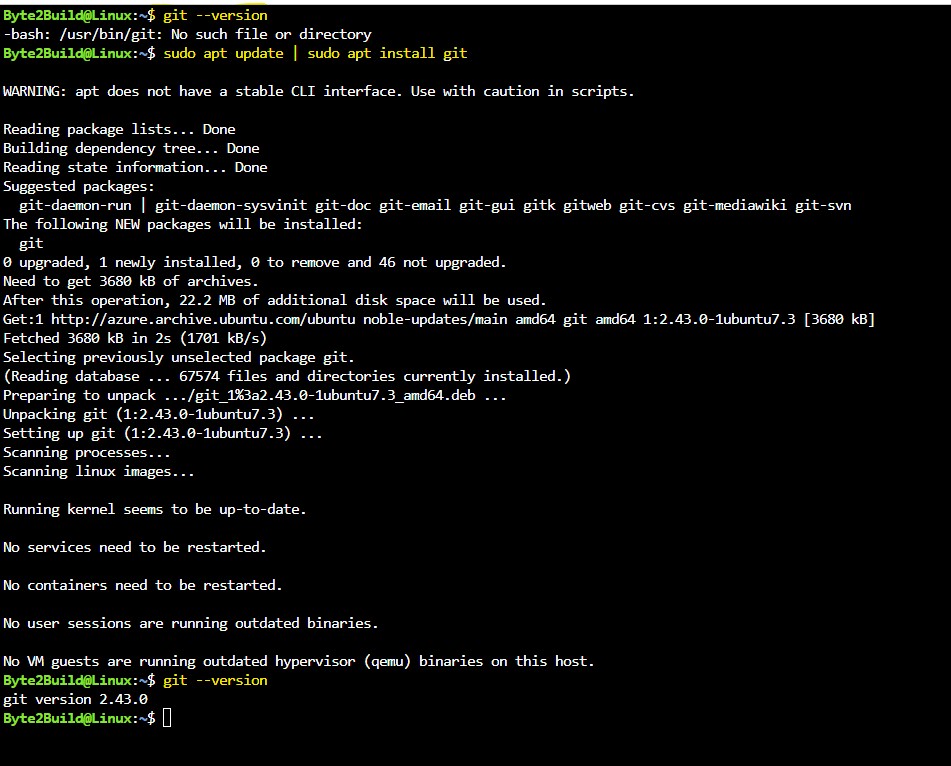
1.1.1 Install Git on Linux
On
most Linux distributions, Git can be installed using the system package
manager.
Step
1: Check if GIT is already installed
Git –version
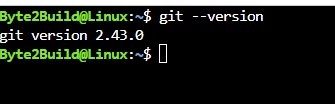
If
the version is 2.20 or higher, can continue or upgrade the latest version.
Step 2: For Debian / Ubuntu based systems:
sudo apt update
sudo apt install git
For Red Hat / CentOS / Rocky Linux:
sudo yum install git
or
sudo dnf install git
1.1.2 Install Git on Windows
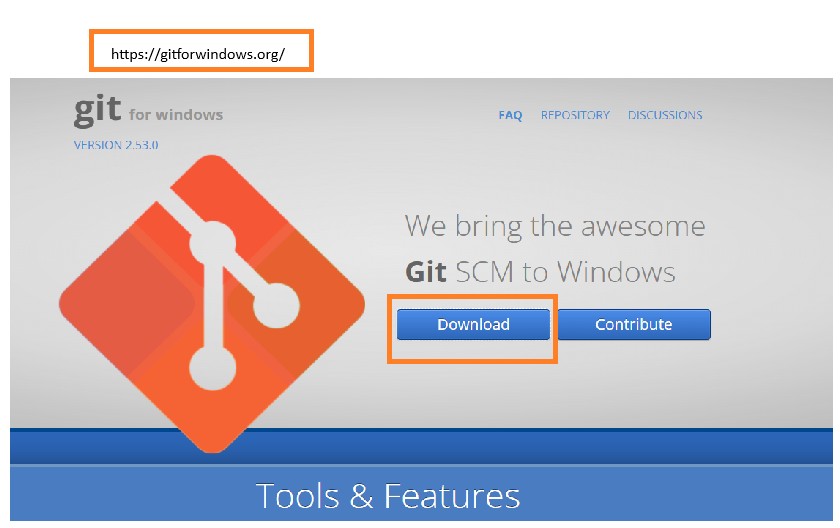
Step1 : Download the installer from the official Git website:
or
- https://gitforwindows.org
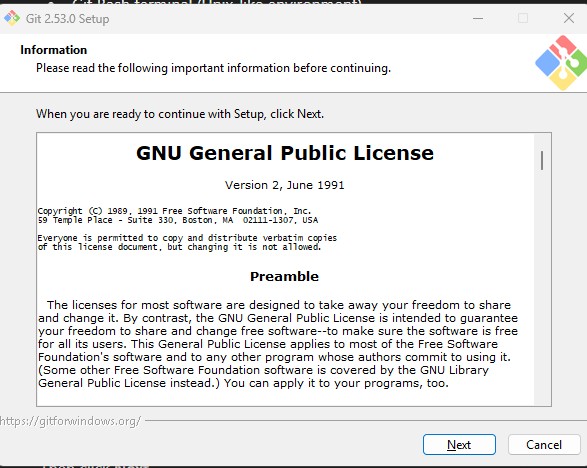
Step 2: Run the Installer
- Open the downloaded
.exefile. - Accept the GNU General Public License. Git is released under the GPL version two license, which is a free software license. This means we can look at Git's code to learn how it works, and we can even modify it to do something different.
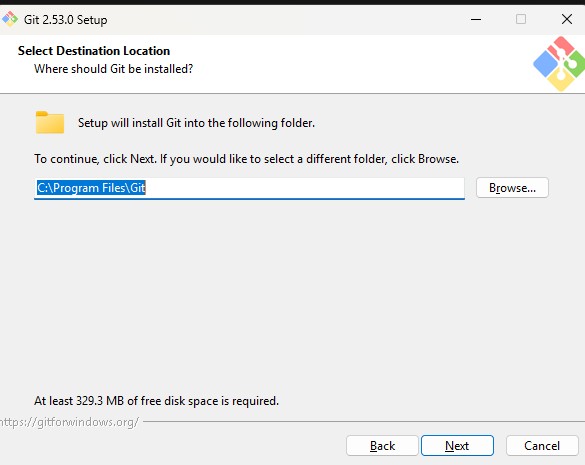
Step 3 : Select Installation Path
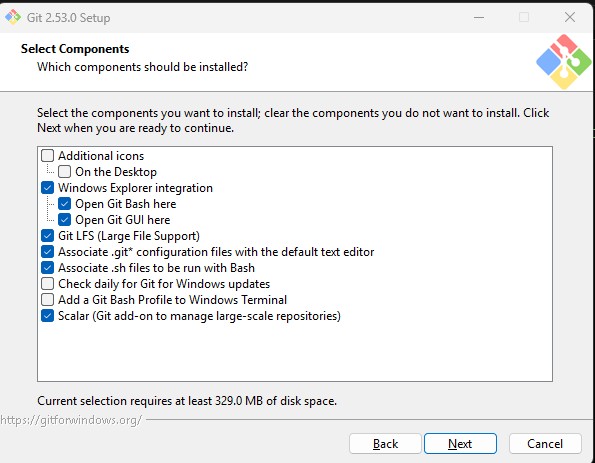
Step 4: Select Components
Keep the default options selected :
- Git Bash
- Git GUI
- Windows Explorer integration
- Git Large File Support (LFS)
These features help manage repositories and large
files efficiently
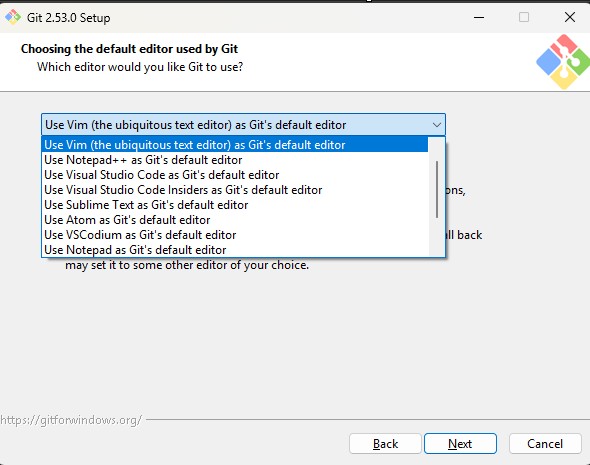
Step
5: Choose Default Editor
Select
the editor Git will use for commit messages.
Common
choices include:
-
Notepad++
-
Visual
Studio Code
-
Sublime
Text
- Vim
Choose the editor you prefer.
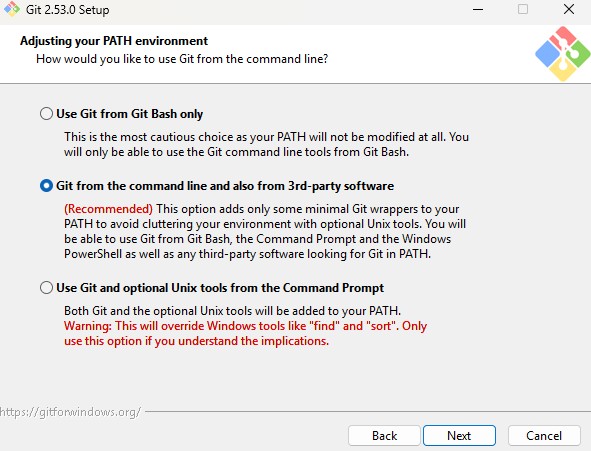
Step 6 : Configure PATH Environment
Git
from the command line and also from 3rd-party software
This
allows Git commands to run from:
-
Git
Bash
-
Command
Prompt
- PowerShell
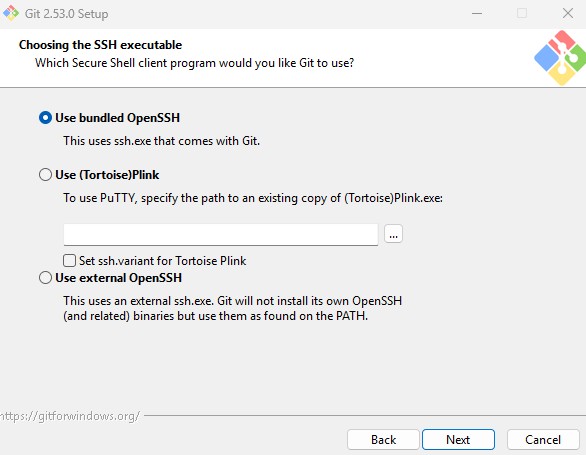
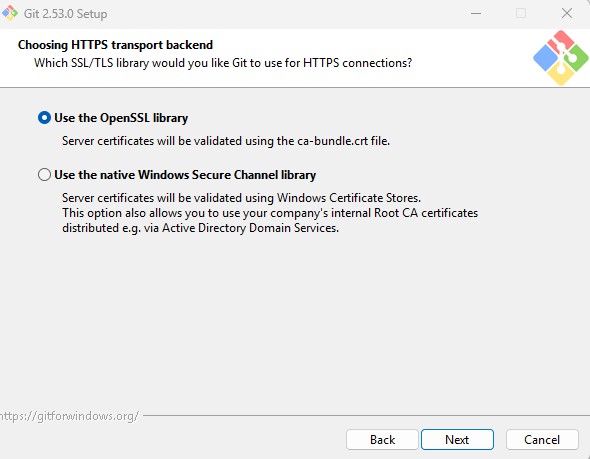
Step 7 : Choose HTTPS Transport
Keep
the default option:
Use
the OpenSSL library.
This
works well for most public Git repositories such as GitHub.
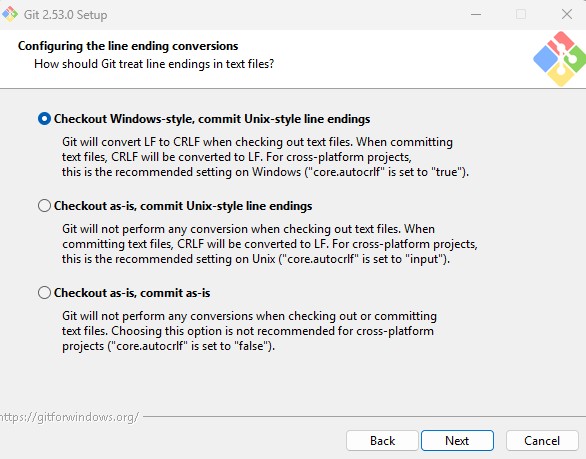
Step 8: Configure Line Ending Conversion
This step determines how Git handles line endings,
which differ between operating systems.
-
Windows uses CRLF
-
Linux and macOS use LF
Git provides options to automatically convert line
endings to maintain compatibility across different systems.
You will see three options:
A) Checkout Windows-style, commit Unix-style line
endings (Recommended)
This option converts LF to CRLF when files are checked
out on Windows, and converts them back to LF when committing to the repository.
This works best when collaborating with developers using different operating
systems.
B) Checkout as-is, commit Unix-style line endings
Files are kept unchanged locally, but Git converts
them to LF when committing. This option is useful if you primarily use
Unix-like tools or editors on Windows.
C) Checkout as-is, commit as-is
No conversion is performed. This option is only
recommended if all collaborators use the same operating system.
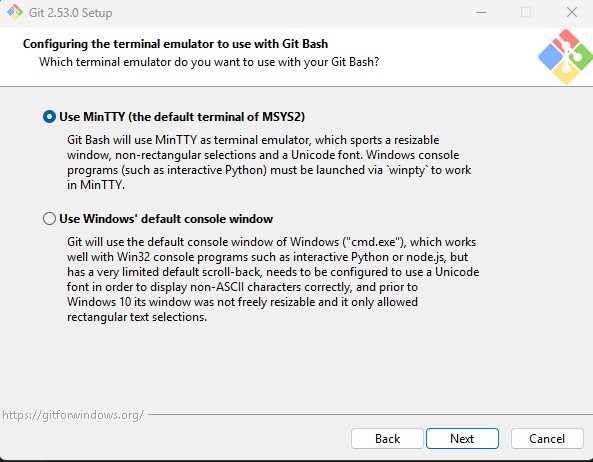
Step 9 : Choose Terminal Emulator
Use MinTTY (the default terminal of Git Bash)
MinTTY provides better command history and Unicode
support.
Step 10 : Choose the Default Behavior of git pull
During installation, Git asks how the git pull command
should behave by default.
git pull downloads changes from the remote repository
and integrates them into the current branch.
You will see three options:
-
A) Fast-forward or merge (Recommended)
Git will first try a fast-forward update. If that is
not possible, it will create a merge commit.
This is the default and safest option for most users.
-
B) Rebase
Git rebases your local commits on top of the fetched
branch. This keeps the commit history cleaner but may rewrite commit history,
which can be confusing for beginners.
-
C) Only ever fast-forward
Git will only update the branch if a fast-forward is
possible. If the histories have diverged, the pull operation will fail.
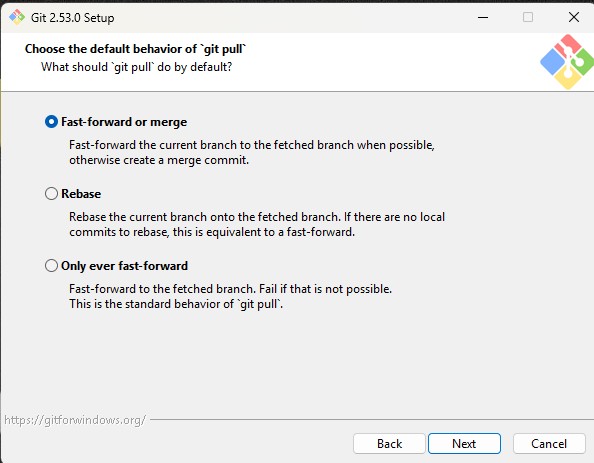
For most beginners and standard workflows, selecting
Fast-forward or merge (recommended) is the best option.
Then click Next to continue the installation.
Step 11
:
Configure Credential Helper
Git now asks which credential helper should be used to
store authentication details when connecting to remote repositories.
You will see two options:
-
A) Git Credential Manager (Recommended)
This option securely stores your credentials (such as
GitHub login or personal access tokens) so that you don’t need to enter them
every time you push or pull changes from a remote repository.
It works across multiple platforms and integrates with
Windows authentication systems.
-
B) None
If this option is selected, Git will not store any
credentials. You will need to manually enter your username and password (or
token) every time you interact with a remote repository.
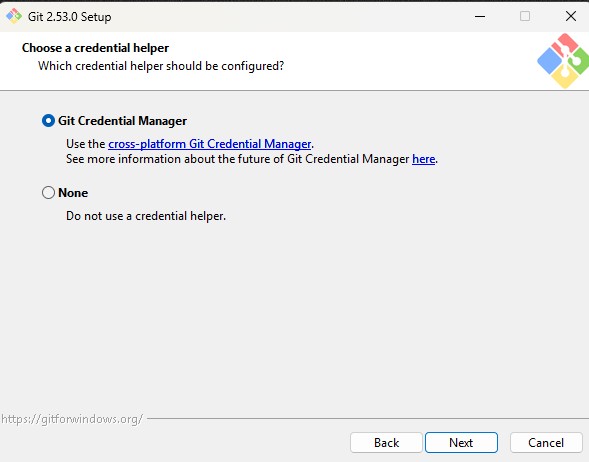
For most users, selecting Git Credential Manager
(recommended) is the best choice.
After selecting the option, click Next to continue the
installation.
Step 12: Configure Extra Options
In this step, the installer allows you to enable
additional features that can improve Git performance and functionality.
You will see two options:
-
A) Enable File System Caching (Recommended)
This option improves Git performance by caching file
system data in memory during certain operations. It speeds up tasks like
scanning repositories and checking file changes.
For most users, this option should remain enabled.
-
B) Enable Symbolic Links
This option allows Git to create symbolic links
(symlinks) in repositories. However, it requires special Windows permissions
and is not commonly needed for standard Git workflows.
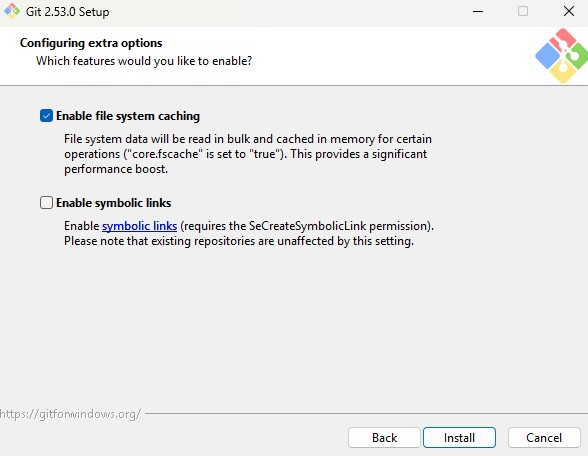
If you are unsure, it is safe to leave this option
disabled.
After confirming the settings, click Install to start
the Git installation process.
Step 13: Installing Git
After completing the configuration steps, the
installer begins copying and extracting the required Git files to your system.
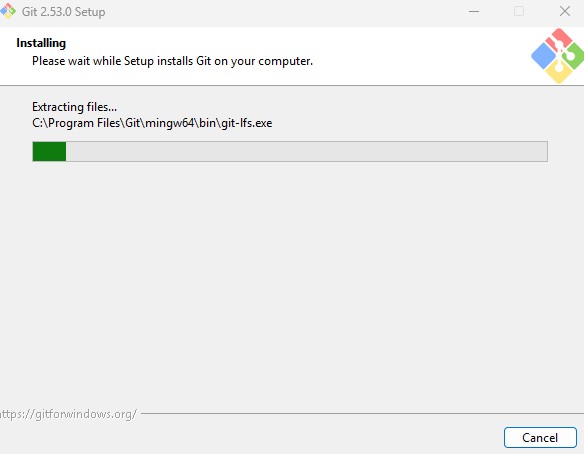
During this stage, the setup program will display a
progress bar while installing components such as:
-
Git command-line tools
- Git Bash environment
-
Git Large File Support (LFS)
Additional Unix-like utilities included with the Git
package
The installation process may take a few moments
depending on your system performance.
Once the progress bar reaches completion, the setup
will automatically move to the final step of the installation.
Step 14: Complete Installation and Verify Git
After the installation finishes, the Completing the
Git Setup Wizard window will appear.
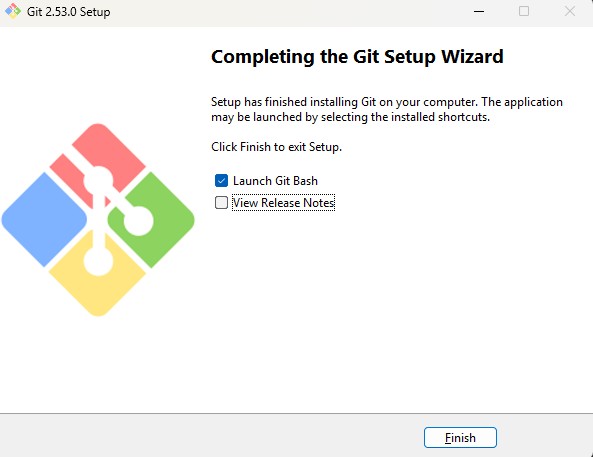
You can optionally enable:
Launch Git Bash – Opens the Git Bash terminal
immediately after installation.
View Release Notes – Displays information about the
installed Git version.
Keep Launch Git Bash selected and click Finish to
complete the installation.
-
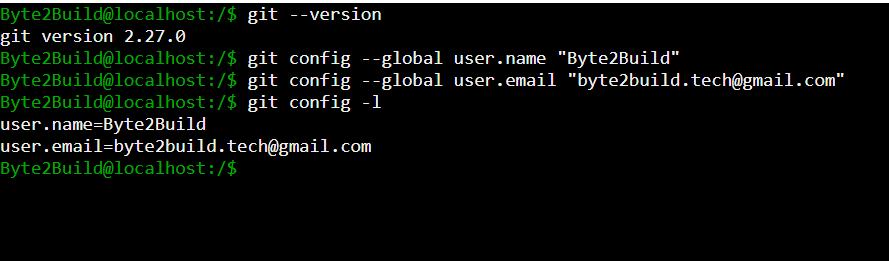
Verify Git Installation
Once Git Bash opens, confirm that Git was installed successfully by running the following command:
git --version
Example output:

If the version number appears, Git has been installed correctly and is ready to use.
1.3 Git Configuration (git config)
Git is a distributed version control system designed
to track changes in files and maintain a complete history of modifications
within a repository.
To achieve this, Git records information about who
made the change and when the change occurred.
Before starting to work with Git, it is important to
configure your identity. This identity is attached to every commit you make,
allowing Git to maintain proper authorship information.
The git config command is used to set configuration
values such as the user name and email address associated with your commits.
Configure User Identity
Use the following commands to configure your Git
identity:
git config --global user.name "Your Name"
git config --global user.email "you@example.com"
The --global flag applies these settings to all Git
repositories on your system. This means every repository you work with will use
this identity by default.
If needed, different configuration values can also be
set for individual repositories.
Verify Git Configuration
You can verify the configured identity using the
following command:
git config -l
Example output:
user.name=Your Name
user.email=you@example.com
This command lists all the configuration settings
currently applied in Git.
Note:
If you are working on multiple projects (for example personal and company projects), you may want to configure different email addresses for different repositories.
1.4 Git Repository
A Git repository is a container that stores the files
of a project along with their complete version history. It enables Git to track
changes made to source code, configuration files, or other project assets over
time.
Inside a repository, Git records every modification.
This allows developers to review previous versions, compare changes, and
collaborate with others efficiently.
There are generally two ways to start working with a
Git repository.
A) Create a New Repository
A new repository can be created on the local system
using the git init command. This approach is typically used when starting a
project from scratch.
B) Clone an Existing Repository
If a repository already exists on a remote platform
such as GitHub, GitLab, or another Git server, it can be copied to the local
system using the git clone command.
In this section, we will focus on creating a new
repository locally using git init. Working with remote repositories will be
discussed in the next section.
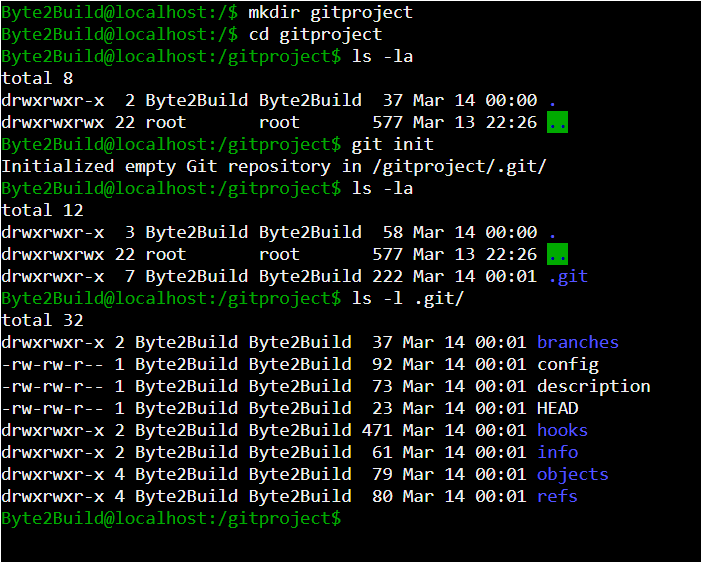
1.4.1 Creating a New Git Repository
First, create a new project directory and move into
it.
mkdir gitproject
cd gitproject
Now initialize the repository.
git init
When the git init command runs successfully, Git
creates a hidden directory called .git inside the project folder.
You can verify this by listing hidden files:
ls -la
To inspect the contents of the Git directory:
ls -l .git/
Example output:
branches
config
description
HEAD
hooks
info
objects
refs
1.4.2 Understanding the .git Directory
The .git directory is the core component of a Git repository. It acts as an internal database where Git stores all repository-related information, including:
- commit history
- metadata about changes
- branch references
-
repository configuration
Every operation performed in Git relies on the information stored in this directory.
Below are the common components found inside the .git
directory.
- branches
This directory was used in older versions of Git to
store branch references. In modern Git versions, branch references are mainly
handled inside the refs directory.
- config
The config file stores repository-specific configuration settings. These settings may include:
- user configuration
- remote repository URLs
-
repository behavior settings
These configurations apply only to the current
repository.
- description
This file is mainly used by Git web interfaces to
provide a short description of the repository. It usually does not affect
normal Git operations.
- HEAD
The HEAD file points to the currently active branch in
the repository.
Example content:
ref: refs/heads/main
This indicates that the repository is currently
working on the main branch.
- hooks
The hooks directory contains scripts that Git can automatically execute at specific stages of the workflow.
These scripts can be used for tasks such as:
- code quality validation
- security checks
- automated deployment
-
commit message validation
- info
This directory contains additional repository
information. A common file inside this directory is exclude, which works
similarly to .gitignore but applies only to the local repository.
- objects
The objects directory is one of the most important parts of the repository. Git stores all repository data here in a compressed format.
This includes:
- file contents
- commit objects
- tree objects
This directory essentially acts as Git’s internal
storage database.
- refs
The refs directory stores references to commits. These references represent branches and tags within the repository.
Common subdirectories include:
refs/heads → branch references
- refs/tags → tag references
-
refs/remotes → remote branch references
Important Note
The .git directory contains critical internal data
used by Git to manage the repository. Because of this, files inside this
directory should never be modified manually.
All repository operations should be performed using
Git commands.