Podman Deep Dive: From Fundamentals to Enterprise Platform Engineering
Container technology has become the backbone of modern software development, DevOps, Platform Engineering, and cloud-native infrastructure. From Red Hat Enterprise Linux (RHEL) and Podman to Kubernetes and Red Hat OpenShift, containers power the applications that run millions of businesses worldwide. Yet, becoming a successful Linux or Platform Engineer is not about memorizing commands like podman run or podman exec. It is about understanding why containers exist, how they are created, what happens inside the Linux kernel, and how to troubleshoot them in real-world production environments. This guide is written for learners who want to move beyond tutorials, develop an engineer's mindset, and build the practical knowledge required to confidently work with enterprise container platforms.
What You'll Learn in This Series
Throughout this series, you will build a solid understanding of the complete Podman ecosystem, from container fundamentals to enterprise administration. The topics covered include:
-
Podman Fundamentals - Architecture,
Container Lifecycle, Images, Containers, Containerfiles, Image Registries
-
Linux Internals - OverlayFS, Namespaces,
cgroups, OCI Runtime (crun/runc), conmon, Process Isolation.
-
Storage, Networking & Security -
Volumes, Bind Mounts, Storage Drivers, Rootless Containers, SELinux,
Seccomp, Container Networking.
-
Pods & Kubernetes Integration - Pods,
Multi-Container Applications, podman generate kube, podman play kube,
Kubernetes & OpenShift Mapping.
-
Enterprise Administration - Buildah,
Skopeo, systemd, Quadlets, Image Management, Automation, Monitoring.
- Troubleshooting & Best Practices - Production Troubleshooting, Performance Tuning, Security Hardening, Interview Questions, Real-World Use Cases .
By the end of this series, you'll understand not only how to use Podman, but also how it works internally and how its architecture integrates with Kubernetes and Red Hat OpenShift.
1. Podman Fundamentals
Before running your first container, it's essential to understand the core concepts that make Podman work. This chapter introduces the fundamentals of container technology, explains the architecture of Podman, and builds the foundation required to understand container execution, Linux internals, and enterprise container platforms such as Kubernetes and Red Hat OpenShift.
1.1 Why Do We Need Containers?
Imagine a software developer building an application on a Red Hat Enterprise Linux 9 system. After writing the code, the developer installs the required libraries, runtime, configuration files, and other dependencies needed for the application. Once development and local testing are complete, the application works perfectly on the developer's machine.
The next step is to hand the
application over to the testing team. Although the tester may also be using Red
Hat Enterprise Linux, the system is often configured differently. Different
library versions, missing dependencies, environment variables, or configuration
settings can cause the application to behave unexpectedly or even fail to
start. This is commonly known as an environment inconsistency problem.
One traditional solution is to create
a Virtual Machine (VM) that replicates the developer's environment.
While this approach provides consistency, each virtual machine requires its own
operating system, CPU, memory, storage, and ongoing maintenance. As the number
of applications grows, managing dozens or even hundreds of virtual machines
become expensive, resource-intensive, and operationally complex.
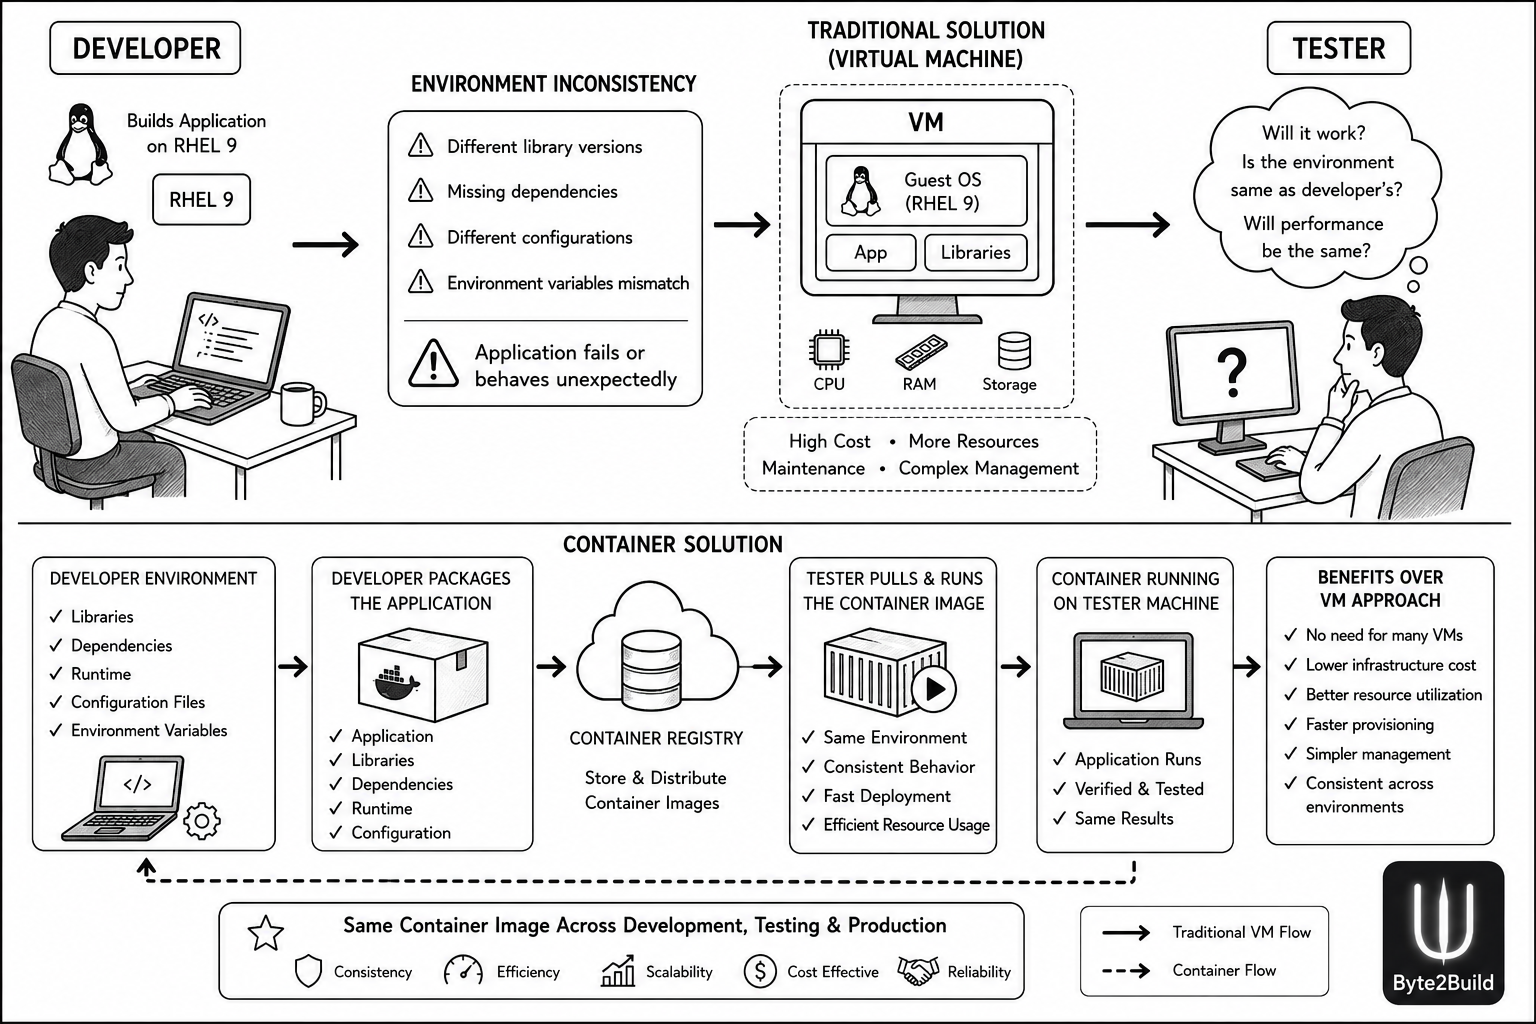
Container technology was introduced to solve these challenges. Instead of recreating an entire operating system for every application, the developer packages the application together with all its required libraries, dependencies, runtime, and configuration into a Container Image . This image is stored in a Container Registry , from where testers, developers, or production systems can download and run the same application in a consistent environment.
By using the same container image
across development, testing, and production, organizations eliminate
environment inconsistencies, reduce infrastructure overhead, improve resource
utilization, and ensure that the application behaves consistently throughout
its lifecycle.
However, before understanding how a
container image becomes a running container, we must first understand two
fundamental concepts of the Linux operating system: User Space and Kernel
Space. These concepts form the foundation of container technology and will
help us understand how Podman interacts with the Linux kernel to create
isolated container environments.
1.2 Linux Filesystem, User Space, and Kernel Space
The Linux filesystem starts from a single root directory (/), and every file and directory in the operating system exists under this root. When we browse the root directory, we find folders such as /bin, /usr, /lib, /etc, /home, and /var, each serving a specific purpose. However, to understand container technology, it is more important to understand how Linux is logically divided into User Space and Kernel Space rather than focusing only on the directory structure.
In the previous section, we learned that containers solve the environment inconsistency problem by packaging an application's libraries, dependencies, runtime, and configuration into a Container Image. However, an important question still remains. If the container already contains everything required to run the application, what does the host operating system provide? Does every container include its own operating system, or does it use the operating system already installed on the host machine? To answer these questions, we must first understand how Linux is organized internally into User Space and Kernel Space. This distinction is the key to understanding why containers are lightweight, efficient, and much faster than traditional virtual machines.
Before understanding containers, we must first understand how an application executes on Linux. Every application requires its executable code, libraries, runtime environment, configuration files, environment variables, and other dependencies. When a user starts an application, either from a shell or another program, the executable is loaded into memory. The application cannot communicate directly with hardware resources such as the CPU, memory, storage, or network devices. Instead, it requests services from the Linux kernel through system calls. The kernel loads the program into memory, allocates RAM, schedules CPU execution, manages file operations, controls network communication, and coordinates hardware resources before returning the results back to the application.
At this point, it is important to understand the difference between User Space and Kernel Space.
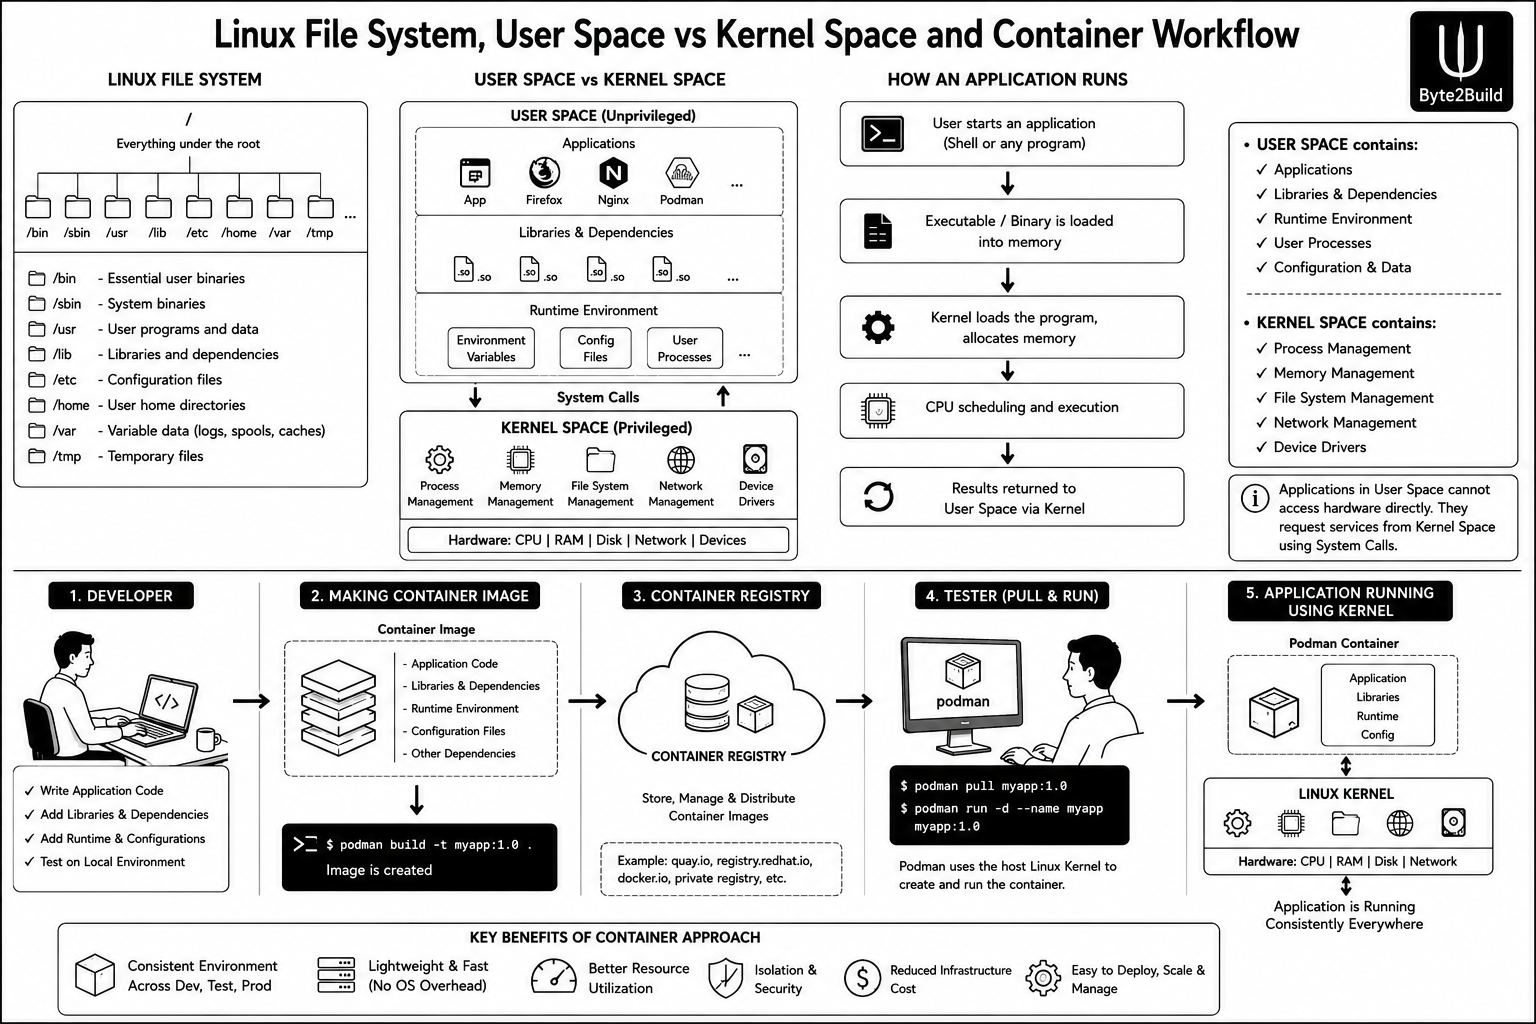
User Space contains everything that belongs to an application. This includes the application executable, libraries, shared libraries (.so files), runtime environment, configuration files, environment variables, user processes, and all other software components required for that specific application to run. These components are application-specific and can vary from one application to another. For example, one application may require version 1.2 of a library, while another application may require version 1.3 or an entirely different dependency. This difference in software requirements is one of the primary reasons applications behave differently across development, testing, and production systems.
Kernel Space, on the other hand, contains the core services provided by the Linux operating system. The kernel is responsible for process management, CPU scheduling, memory management (RAM), file system management, network management, device drivers, hardware communication, and security enforcement. These services remain common for every application running on the host system. Whether the system is running a web server, a Java application, a Python program, or a database server, every application depends on the same Linux kernel to communicate with the underlying hardware. The kernel acts as the engine of the operating system, providing a consistent interface between software and hardware.
This separation between User Space and Kernel Space forms the foundation of container technology. The software components inside User Space change from one application to another because every application has its own libraries, runtime, configuration files, and dependencies. In contrast, the services provided by Kernel Space remain the same regardless of which application is running. Every application ultimately depends on the same kernel to access the CPU, memory, storage, networking, and other hardware resources.
Container technology takes advantage of this architecture. Instead of packaging an entire operating system, the developer packages only the User Space components required by the application, including its executable, libraries, dependencies, runtime environment, configuration files, and environment variables, into a Container Image. Since the Linux kernel is already available on the host machine, there is no need to package it inside every container. This significantly reduces image size, improves startup time, and makes containers much more lightweight than traditional virtual machines.
The completed Container Image is then stored in a Container Registry, where it can be shared with developers, testers, or production environments. A tester simply downloads the same image and runs it using Podman. During execution, Podman works with the host Linux kernel to create an isolated container environment. Although multiple containers may run different applications with different libraries and dependencies, they all share the same host Linux kernel. This architecture ensures that every application runs consistently across development, testing, and production while eliminating dependency conflicts and environment inconsistencies.
With this understanding, we now know why only the User Space is packaged into a Container Image and how the Linux kernel provides the isolated execution environment required to run it. The next step is to explore the tools that make this possible in practice.
1.3 Podman Ecosystem
In the previous sections, we learned why containers were introduced and how Linux separates User Space and Kernel Space to make containerization possible. However, understanding the Linux kernel alone is not enough to build and run containers. A complete container platform consists of several tools, each responsible for a specific task, such as building images, storing images, transferring images, and running containers. Together, these components form the Podman Ecosystem.
1.3.1 Container Image
A Container Image is a portable, read-only package that contains everything required to run an application. It includes the application code, executable binaries, libraries, runtime environment, configuration files, environment variables, and other dependencies. A container image does not contain the Linux kernel because it shares the host operating system's kernel.
Container images are immutable, meaning their contents do not change after they are built. Whenever an application needs to be updated, a new image is created rather than modifying the existing one. This ensures consistency across development, testing, and production environments.
Key Components
•Application Code
•Executable Binaries
•Shared Libraries
•Runtime Environment
•Configuration Files
•Environment Variables
•Metadata
•Read-only Image Layers
Key Responsibility: Packages the application and all required software dependencies.
1.3.2 Container
A Container is a running instance of a Container Image. When a container image is executed by a container engine such as Podman, the Linux kernel creates an isolated execution environment using namespaces and cgroups. A new writable layer is added on top of the read-only image layers, allowing the application to create files and store temporary data during execution.
Although multiple containers may run on the same host, each container behaves as an independent system with its own processes, filesystem, networking, and hostname while securely sharing the same Linux kernel.
Container Image + Writable Layer + Linux Kernel = Running Container.
Key Responsibility: Provides an isolated runtime environment for the application.
1.3.3 Container Engine
A Container Engine is software that creates, runs, stops, removes, and manages containers. It acts as the bridge between the user and the Linux kernel, providing a simple interface to work with container images and containerized applications. The container engine communicates with the underlying container runtime to create isolated execution environments.
Examples
•Podman
•Docker
•containerd
•CRI-O
1.3.4 Container Runtime
A Container Runtime is the low-level software responsible for creating and starting containers. It works directly with the Linux kernel to create namespaces, configure cgroups, mount the container filesystem, and start the container's main process. Users generally do not interact with the runtime directly; instead, it is invoked by a container engine such as Podman.
Examples
•crun
•runc
1.3.5 Podman
Podman is an open-source, daemonless container engine used to build, run, manage, and deploy OCI-compliant containers and pods. It provides a secure, rootless-first approach to container management while working directly with the Linux kernel through an OCI runtime. Podman is the default container engine for Red Hat Enterprise Linux and integrates naturally with Kubernetes and Red Hat OpenShift.
1.3.6 Buildah
Buildah is an open-source tool designed specifically for building OCI-compliant container images. It creates, modifies, and builds container images from Containerfiles or directly from the command line without requiring a running container.
1.3.7 Skopeo
Skopeo is an image management tool used to inspect, copy, sign, and transfer container images between local storage and remote container registries. Unlike Podman, Skopeo works directly with container images and does not run containers.
1.3.8 CRI-O
CRI-O is a lightweight container runtime built specifically for Kubernetes and Red Hat OpenShift. It implements the Kubernetes Container Runtime Interface (CRI) and is responsible for running containers inside Kubernetes clusters.
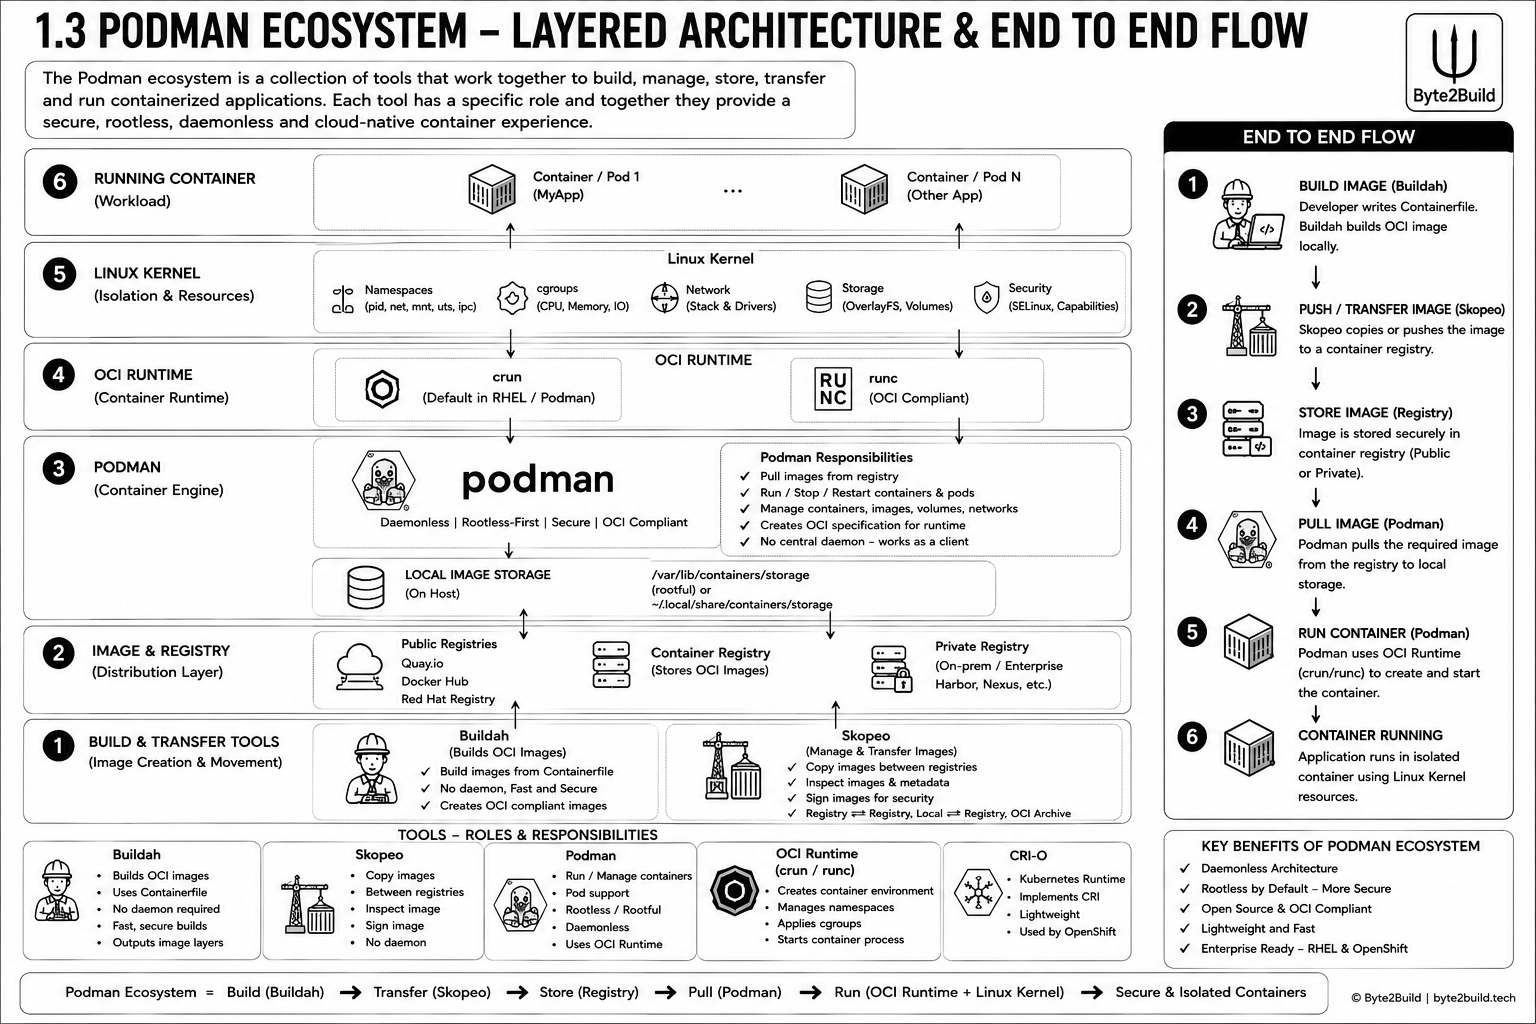
In enterprise environments, engineers rarely troubleshoot only Podman. Most issues involve multiple layers such as the container image, registry, storage, networking, SELinux, or the OCI runtime. Understanding the complete Podman ecosystem helps isolate problems more quickly and improves troubleshooting efficiency.
1.4 Podman Architecture and Internal Working
In the previous section, we explored the Podman ecosystem and the tools responsible for building, transferring, storing, and running container images. In this chapter, we will take a practical approach to understand Podman's internal architecture. Instead of only studying diagrams, we will execute Podman commands and observe how images are downloaded, stored, and managed inside the Linux filesystem. By the end of this chapter, you will clearly understand what happens internally when you execute podman pull and podman run.
1.4.1 Installing Podman (Lab Setup)
Install Podman using the following commands.
sudo dnf update
sudo dnf install podman
podman version
[root@Byte2Build ~]#  dnf install podman -y

Updating Subscription Management repositories.
Last metadata expiration check: 0:53:11 ago on Tue Aug 11 01:40:13 2026.
Package podman-7:5.8.2-5.el10_2.x86_64 is already installed.
Dependencies resolved.
Nothing to do.
Complete!

[root@Byte2Build ~]# podman version

Client:        Podman Engine
Version:       5.8.2
API Version:   5.8.2
Go Version:    go1.26.5 (Red Hat 1.26.5-1.el10_2)
Git Commit:    a476c2b2c35443a3db1a1668ac7b402eb1eb0619
Built:         Fri Jul 10 00:00:00 2026
Build Origin:  Red Hat, Inc. <http://bugzilla.redhat.com/bugzilla>
OS/Arch:       linux/amd64
If you are logged in as the root user, sudo is not required.
Verify the installation by checking the installed Podman version.
1.4.2 Container Registry
Before downloading our first container image, we must understand where container images are stored.
A Container Registry is a centralized repository used to store, manage, version, and distribute OCI-compliant container images. Developers build container images and push them to a registry, while testers, administrators, or production servers pull the same images whenever required.
Examples
•registry.access.redhat.com
•registry.redhat.io
•quay.io
•docker.io (Docker Hub)
•ghcr.io (GitHub Container Registry)
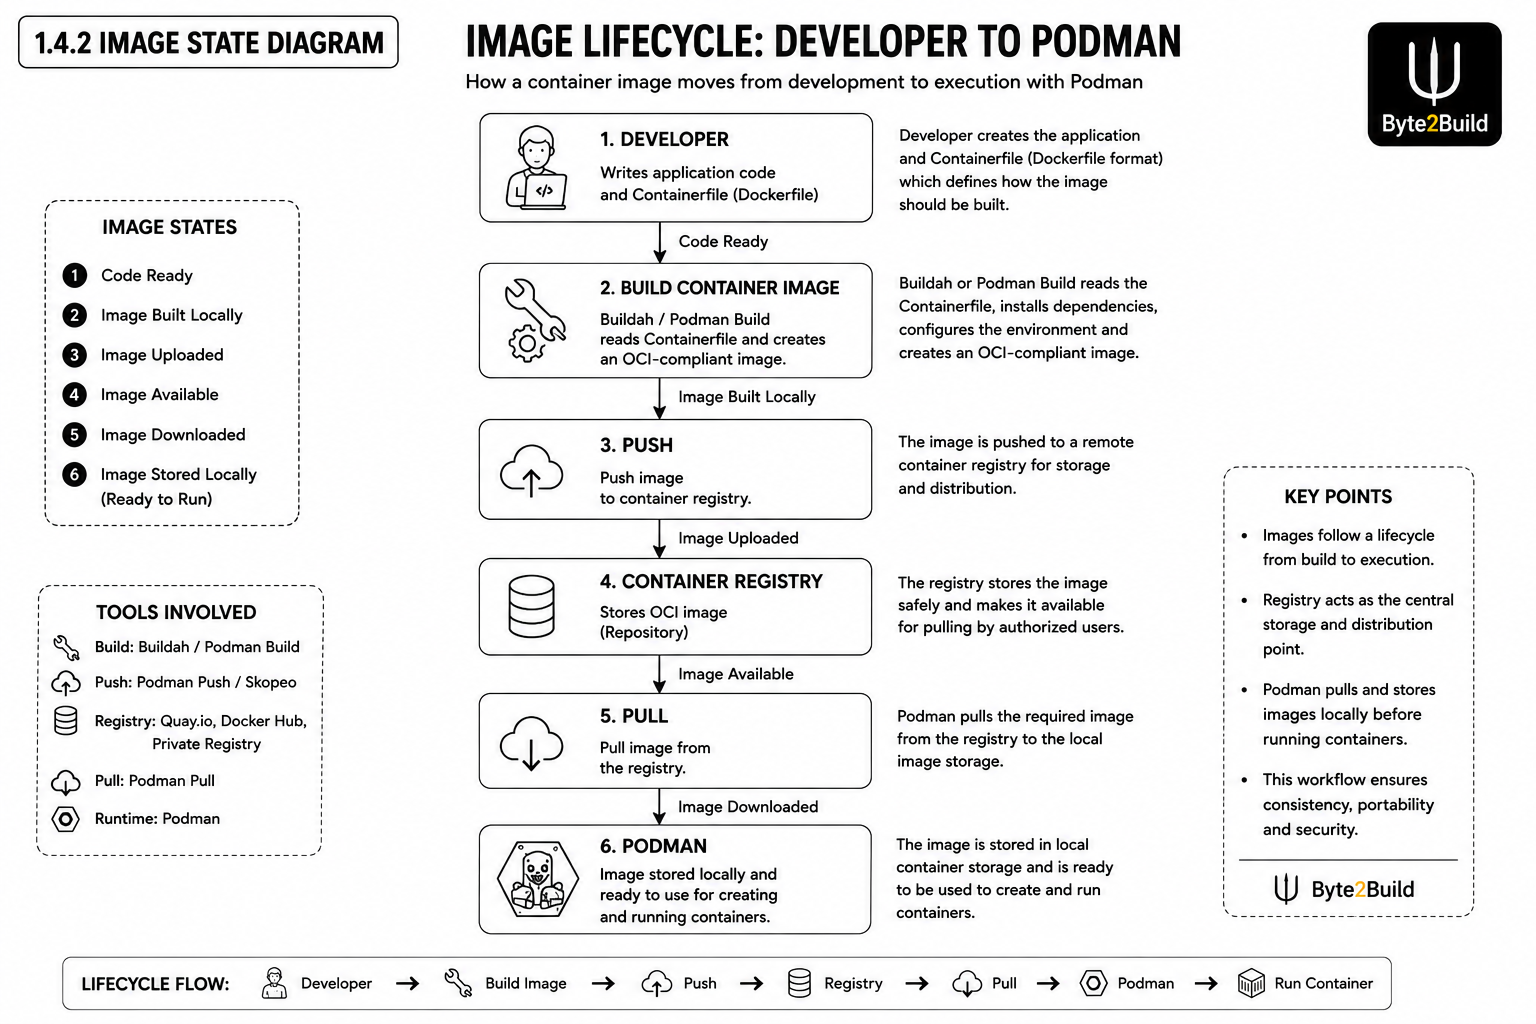
1.4.3 Pull Your First Container Image
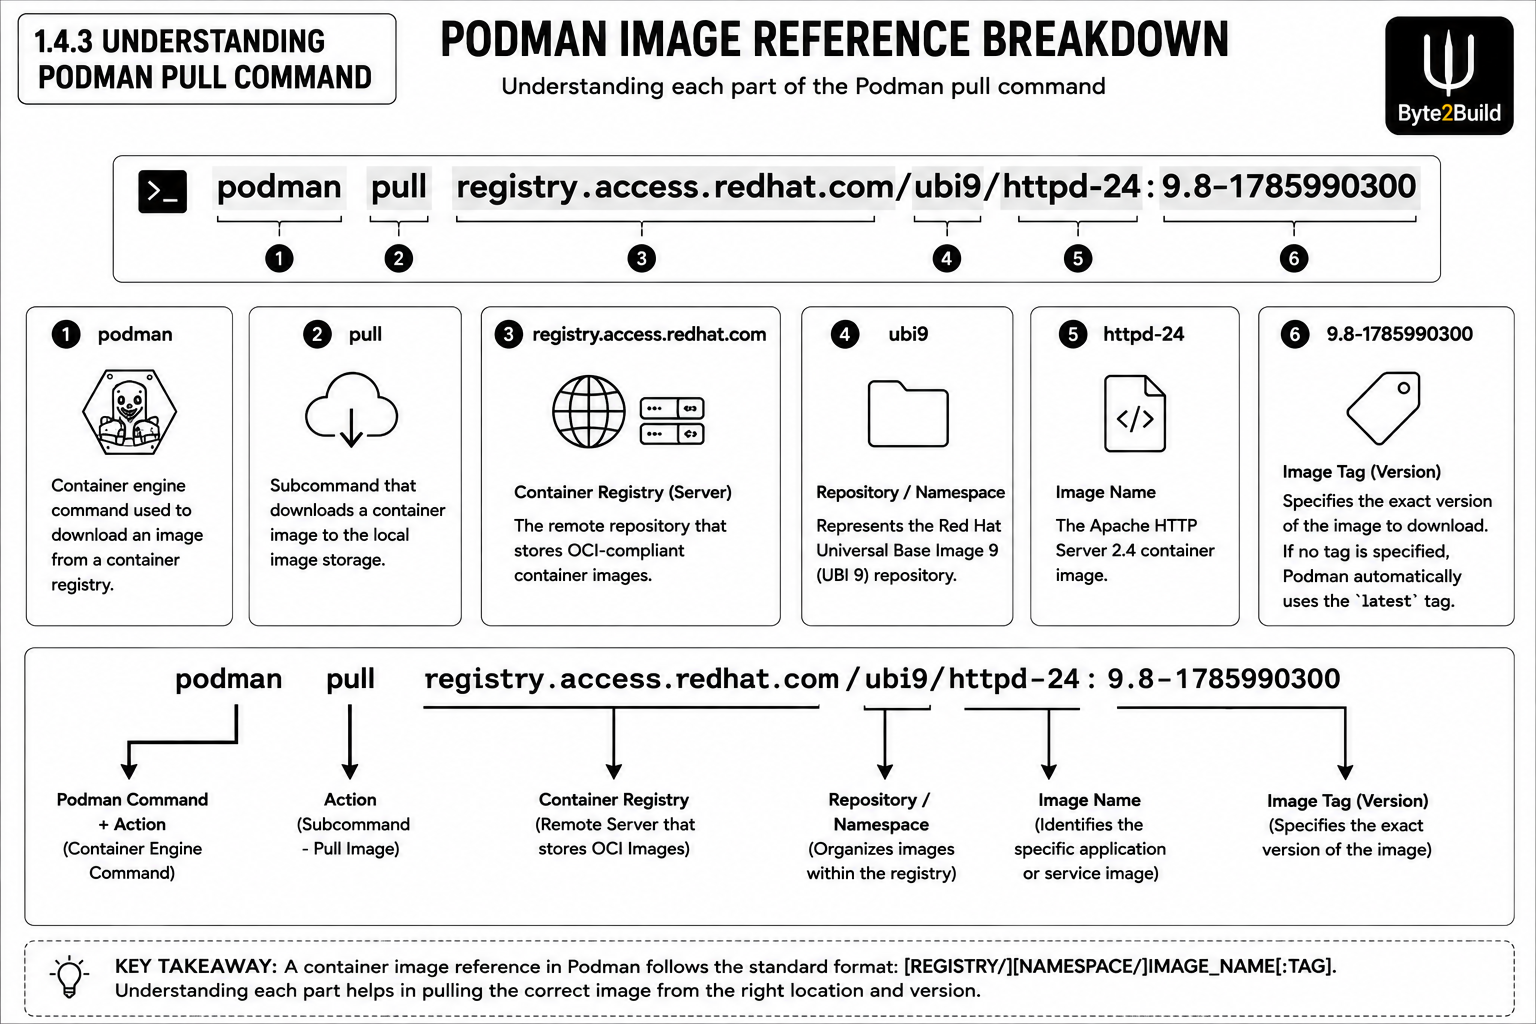
Download the UBI9 HTTPD image from the Red Hat Container Registry.
podman pull registry.access.redhat.com/ubi9/httpd-24:9.8-1785990300
[root@Byte2Build ~]# podman pull registry.access.redhat.com/ubi9/httpd-24:9.8-1785990300

Trying to pull registry.access.redhat.com/ubi9/httpd-24:9.8-1785990300...
Getting image source signatures
Checking if image destination supports signatures
Copying blob 6c499c857aeb done   |
Copying blob c1c483020efb done   |
Copying blob e5cf4fb02919 done   |
Copying config 39a151cad9 done   |
Writing manifest to image destination
Storing signatures
39a151cad9e9f78ac5511e4b74b19f13f5ace5f3921038931fe21b6a6b25b149
What Happens Internally?
When the command is executed, several components work together.
Step 1 – Podman
Podman receives the pull request and parses the image name. It determines which registry to contact and checks whether the requested image already exists in the local image store.
Step 2 – Container Registry
If the image is not available locally, Podman connects to the specified container registry. The registry returns the image manifest, metadata, and the list of OCI image layers that make up the container image.
Step 3 – Skopeo (Behind the Scenes)
Although you are executing a Podman command, Podman uses image-copying libraries from the same container ecosystem to communicate with registries, retrieve image metadata, verify image manifests, and securely transfer image layers from the remote registry to the local system. This is the same image transport capability that Skopeo is designed for.
Step 4 – Buildah
Buildah is not involved during the podman pull operation.
Its responsibility is to build and modify container images, not download them. Once an image has been downloaded, Buildah can be used later to create a new custom image or modify an existing one.
Step 5 – Local Storage
After all image layers are verified successfully, Podman stores them under the local container storage.
/var/lib/containers/storage/
[root@Byte2Build ~]# ls -lash /var/lib/containers/storage/
total 132K
4.0K drwxr-xr-x. 9 root root 4.0K Aug 11 01:51 .
   0 drwxr-xr-x. 5 root root   50 Aug 11 01:55 ..
112K -rw-r--r--. 1 root root 112K Aug 11 01:51 db.sql
4.0K -rw-r--r--. 1 root root    8 Aug 11 01:51 defaultNetworkBackend
   0 drwx------. 2 root root    6 Aug 11 01:51 libpod
4.0K drwx------. 7 root root 4.0K Aug 11 02:33 overlay
   0 drwx------. 2 root root   29 Aug 11 01:51 overlay-containers
   0 drwx------. 3 root root  116 Aug 11 02:13 overlay-images
4.0K drwx------. 3 root root 4.0K Aug 11 01:55 overlay-layers
4.0K -rw-r--r--. 1 root root   64 Aug 11 02:33 storage.lock
   0 drwx------. 2 root root    6 Jun 17  2025 tmp
   0 -rw-r--r--. 1 root root    0 Aug 11 01:51 userns.lock
   0 drwx------. 2 root root    6 Aug 11 01:51 volumes
The downloaded image is now available locally and can be viewed using:
podman images
or
podman image list
[root@Byte2Build ~]#  podman image list

REPOSITORY                                TAG             IMAGE ID      CREATED     SIZE
registry.access.redhat.com/ubi9/httpd-24  9.8-1785990300  39a151cad9e9  4 days ago  310 MB
Podman also assigns a unique Image ID : 39a151cad9e9 which identifies the downloaded OCI image in the local storage.
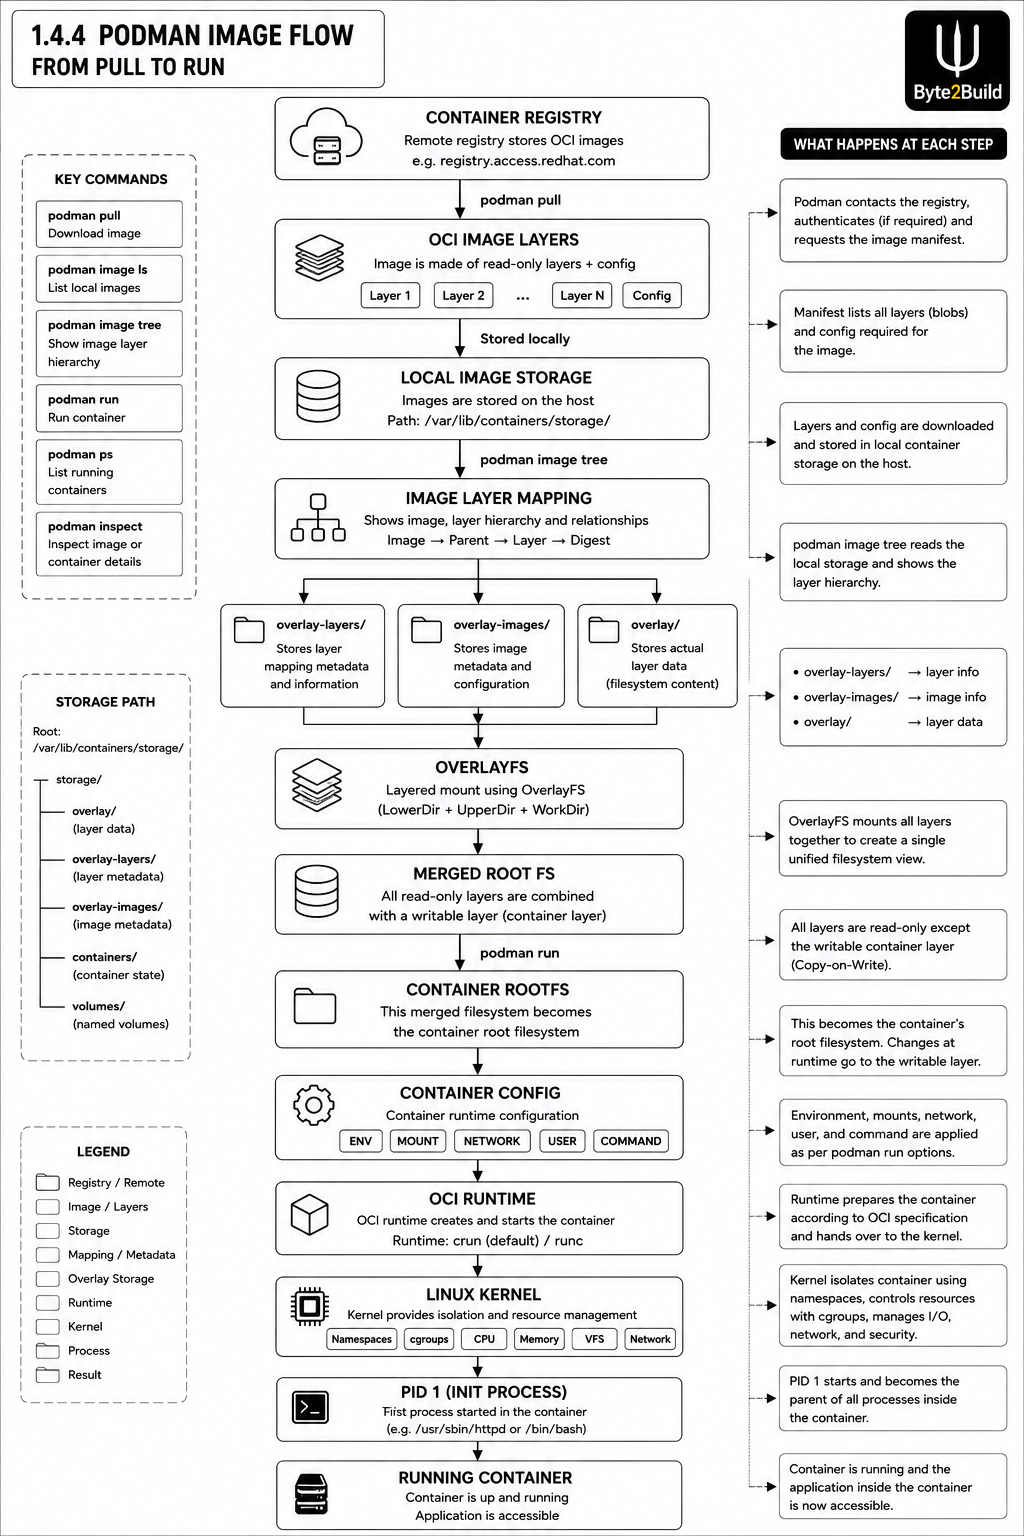
1.4.4 Exploring Podman Image Storage Architecture
After successfully downloading the container image, Podman stores it inside the local container storage. Before exploring the filesystem, let's first understand how the downloaded image is organized internally.
Display the image layer hierarchy:
podman image tree registry.access.redhat.com/ubi9/httpd-24:9.8-1785990300
or
podman image tree IMAGE_ID


Examples :
podman image tree 39a151cad9e9
[root@Byte2Build ~]# podman image tree 39a151cad9e9
Image ID: 39a151cad9e9
Tags:     [registry.access.redhat.com/ubi9/httpd-24:9.8-1785990300]
Size:     309.9MB
Image Layers
├── ID: f2890a7189ea Size: 219.5MB
├── ID: 578fa8fdb023 Size: 57.93MB
└── ID: 7b9a05f89521 Size: 32.31MB Top Layer of: [registry.access.redhat.com/ubi9/httpd-24:9.8-1785990300]
The output displays the complete parent-child relationship between the OCI image layers. Instead of a single large file, a container image is built from multiple read-only layers, where each layer represents a specific filesystem change. These layers are stacked together to form the final container image.
At this stage, you may ask:
Where are these layers stored on the Linux host?
To answer this, navigate to the Podman storage directory.
cd /var/lib/containers/storage
tree -L 1
[root@Byte2Build ~]# cd /var/lib/containers/storage
tree -L 1
.
├── db.sql
├── defaultNetworkBackend
├── libpod
├── overlay              # Container filesystem( Conatiner Storage and OverlayFS Structures)
├── overlay-containers   # Container Metadata
├── overlay-images       # Image Metadata
├── overlay-layers       # Layer Metadata
├── storage.lock
├── tmp
├── userns.lock
└── volumes              # Persistent Volumes
8 directories, 4 files
- overlay/ : Stores the actual image filesystem layers, writable container layers, merged filesystem, and OverlayFS working directories.
ls -lash /var/lib/containers/storage/overlay/
This is where our investigation begins to connect with the next chapter 1.4.5.
- overlay-images/ :Maps each Image ID to its OCI image metadata, manifest, repository, and tags.
ls -lash /var/lib/containers/storage/overlay-images/
[root@Byte2Build ~]#
 ls -lash /var/lib/containers/storage/overlay-images/
total 36K
4.0K drwx------. 6 root root 4.0K Aug 13 10:03 .
4.0K drwx------. 8 root root 4.0K Aug 13 06:27 ..
4.0K drwx------. 2 root root 4.0K Aug 13 06:27 26b2eb03618e749084668eaff68cff8f81dda12d06ac641be7a6398b82a6f25b
4.0K drwx------. 2 root root 4.0K Aug 13 06:27 321674f9d314894eb53e6be561f9beac35969782bf43d56a01ffef7c492792c3
4.0K drwx------. 2 root root 4.0K Aug 13 10:03 39a151cad9e9f78ac5511e4b74b19f13f5ace5f3921038931fe21b6a6b25b149
4.0K drwx------. 2 root root 4.0K Aug 13 06:27 e6ebb27dc26da18a0be15e06cc98f64a0a3ad3ba2ad5a5691dc6b10ef22a3da1
8.0K -rw-------. 1 root root 7.6K Aug 13 10:03 images.json
4.0K -rw-r--r--. 1 root root   64 Aug 13 10:03 images.lock
- overlay-layers/ :Stores metadata describing every image layer and the parent-child relationship displayed by podman image tree.
ls -lash /var/lib/containers/storage/overlay-layers/
Think about the relationship like this: podman image tree → Logical image layer view (Layer A → Layer B → Layer C) → layer metadata stored under overlay-layers/.
So, podman image tree
shows us the layer hierarchy;
overlay-layers/
is part of the storage metadata used to maintain that layer relationship.
- overlay-containers/ : Stores metadata for running and stopped containers, including configuration, writable layer references, mount information, and runtime state.
ls -lash /var/lib/containers/storage/overlay-containers/
[root@Byte2Build ~]# ls -lash /var/lib/containers/storage/overlay-containers/
total 12K
   0 drwx------. 3 root root  124 Aug 13 06:27 .
4.0K drwx------. 8 root root 4.0K Aug 13 06:27 ..
   0 drwx------. 3 root root   22 Aug 13 06:27 2e7f71b5fcc832791a5859332881cfb2396d4966660b10fffd531a8227045f4e
4.0K -rw-------. 1 root root  601 Aug 13 06:27 containers.json
4.0K -rw-r--r--. 1 root root   64 Aug 13 06:27 containers.lock
Notice that this identifier is different from the Image ID: 39a151cad9e9f78ac5.. and Container ID: 2e7f71b5fcc..
This gives us another fundamental concept:
          +-------+
          | IMAGE |
          +---+---+
              |
             run
              |
              v
          +----------+
         | CONTAINER |
         +-----+-----+
              |
         +----+------+
         |           |
         v           v
   Image ID    Container ID
An image identifies the image. A container has its own container identity and state.
Therefore, multiple containers can be created from the same image while maintaining independent container state.
- volumes/ : Stores persistent Podman volumes that remain available even after containers are removed.
ls -lash /var/lib/containers/storage/volumes/
[root@Byte2Build ~]#
 ls -lash /var/lib/containers/storage/volumes/
total 4.0K
   0 drwx------. 3 root root   78 Aug 13 06:27 .
4.0K drwx------. 8 root root 4.0K Aug 13 06:27 ..
   0 drwx------. 3 root root   19 Aug 13 06:27 280e750e21d88b44a15b88eee987dec25a361d1311695a93f7b106e4fb0f6ec1
This directory represents Podman-managed persistent volume storage.
A volume has a different purpose from the container's writable OverlayFS layer:
Container writable layer -> Container-specific runtime changes .
Volume -> Persistent application data.
For example, an application might write database data to a volume rather than relying on the container's writable layer.
Container lifecycle and persistent-data lifecycle are different. Removing a container does not necessarily mean the associated persistent volume must disappear.
- libpod/: Stores Podman's internal database, which tracks images, containers, networks, and volumes.
ls -lash /var/lib/containers/storage/libpod/
Depending on the Podman/storage version and configuration, you may see internal database/state files.
This is internal Podman state, rather than the actual filesystem contents of the image.